Template:REQ-R2
R2 Series Requirements | |||||
|---|---|---|---|---|---|
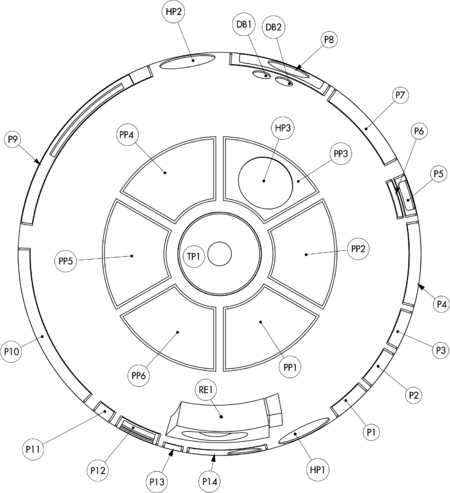
| Dome | |||||

|
Ref# | Name | Color | Notes | Complete |
| BC | Dome Base Color | {{{basecolor}}} | |||
| DB1 | Dome Button 1 | {{{paccentcolor}}} | |||
| DB2 | Dome Button 2 | {{{paccentcolor}}} | |||
| HP1 | Holo Projector 1 | Aluminum | |||
| HP2 | Holo Projector 2 | Aluminum | |||
| HP3 | Holo Projector 3 | Aluminum | |||
| PP1 | Pie Panel 1 | {{{paccentcolor}}} | |||
| PP2 | Pie Panel 2 | {{{paccentcolor}}} | |||
| PP3 | Pie Panel 3 | {{{paccentcolor}}} | |||
| PP4 | Pie Panel 4 | {{{paccentcolor}}} | |||
| PP5 | Pie Panel 5 | {{{paccentcolor}}} | |||
| PP6 | Pie Panel 6 | {{{paccentcolor}}} | |||
| P1 | Panel 1 | {{{paccentcolor}}} | |||
| P2 | Panel 2 | {{{paccentcolor}}} | |||
| P3 | Panel 3 | {{{paccentcolor}}} | |||
| P4 | Panel 4 | {{{paccentcolor}}} | |||
| P5 | Panel 5 (Magic Panel) | {{{paccentcolor}}} | |||
| P6 | Panel 6 | {{{paccentcolor}}} | |||
| P7 | Panel 7 | {{{paccentcolor}}} | |||
| P8 | Panel 8 | {{{paccentcolor}}} | |||
| P9 | Panel 9 | {{{paccentcolor}}} | |||
| P10 | Panel 10 | {{{paccentcolor}}} | |||
| P11 | Panel 11 | {{{paccentcolor}}} | |||
| P12 | Panel 12 | {{{paccentcolor}}} | |||
| P13 | Panel 13 | {{{paccentcolor}}} | |||
| P14 | Panel 14 | {{{paccentcolor}}} | |||
| RE1 | Radar Eye | {{{paccentcolor}}} | |||
| TP1 | Top Panel | {{{paccentcolor}}} | |||
| DR | Dome Ring | {{{paccentcolor}}} | |||
| Additional Dome Notes: | |||||
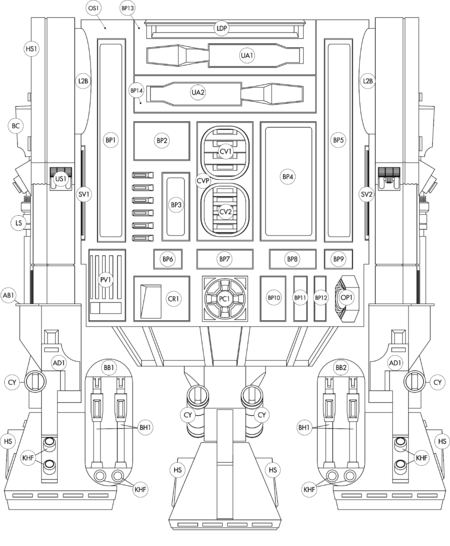
| Body | |||||
 |
Ref# | Name | Color | Notes | Complete |
| OS1 | Skin Color (Primary) | {{{os1}}} | |||
| BP1 | Body Panel 1 | {{{os1}}} | |||
| BP2 | Body Panel 2 | {{{os1}}} | |||
| BP3 | Body Panel 3 | {{{os1}}} | |||
| BP4 | Body Panel 4 | {{{os1}}} | |||
| BP5 | Body Panel 5 | {{{os1}}} | |||
| BP6 | Body Panel 6 | {{{os1}}} | |||
| BP7 | Body Panel 7 | {{{os1}}} | |||
| BP8 | Body Panel 8 | {{{os1}}} | |||
| BP9 | Body Panel 9 | {{{os1}}} | |||
| BP10 | Body Panel 10 | {{{os1}}} | |||
| BP11 | Body Panel 11 | {{{os1}}} | |||
| BP12 | Body Panel 12 | {{{os1}}} | |||
| BP13 | Body Panel 13 | {{{os1}}} | |||
| BP14 | Body Panel 14 | {{{os1}}} | |||
| BP15 | Body Panel 15 | {{{os1}}} | |||
| BP16 | Body Panel 16 | {{{os1}}} | |||
| BP17 | Body Panel 17 | {{{os1}}} | |||
| BP18 | Body Panel 18 | {{{os1}}} | |||
| BP19 | Body Panel 19 | {{{os1}}} | |||
| BP20 | Body Panel 20 | {{{os1}}} | |||
| BP21 | Body Panel 21 | {{{os1}}} | |||
| BP22 | Body Panel 22 | {{{os1}}} | |||
| BP23 | Body Panel 23 | {{{os1}}} | |||
| BP24 | Body Panel 24 | {{{os1}}} | |||
| CVP | Center Vent Panel | {{{paccentcolor}}} | |||
| CR1 | Coin Return 1 (Front) | {{{paccentcolor}}} | |||
| CR2 | Coin Return 2 (Rear Left) | {{{paccentcolor}}} | |||
| CR3 | Coin Return 3 (Rear Right) | {{{paccentcolor}}} | |||
| CV1 | Center Vent (Upper) | Aluminum | |||
| CV2 | Center Vent (Lower) | Aluminum | |||
| L2B | Leg to Body Hub | Aluminum | |||
| LDP | Large Data Port | {{{paccentcolor}}} | |||
| OP1 | Octagon Port 1 (Front) | {{{paccentcolor}}} | |||
| OP2 | Octagon Port 2 (Rear) | {{{paccentcolor}}} | |||
| PC1 | Power Coupler 1 (Front) | {{{paccentcolor}}} | |||
| PC2 | Power Coupler 2 (Rear) | {{{paccentcolor}}} | |||
| PV1 | Pocket Vent (Front) | {{{paccentcolor}}} | |||
| PV2 | Pocket Vent (Rear) | {{{paccentcolor}}} | |||
| SV1 | Side Vent 1 | {{{paccentcolor}}} | |||
| SV2 | Side Vent 2 | {{{paccentcolor}}} | |||
| UA1 | Utility Arm 1 (Upper) | {{{paccentcolor}}} | |||
| UA2 | Utility Arm 2 (Lower) | {{{paccentcolor}}} | |||
| AD1 | Ankle Details | {{{paccentcolor}}} | |||
| BB1 | Battery Box 1 (Left) | {{{os1}}} | |||
| BB2 | Battery Box 2 (Right) | {{{os1}}} | |||
| BH1 | Battery Harness | {{{paccentcolor}}} | |||
| AB1 | Ankle Base Plate | Aluminum | |||
| KHF | Knurled Hose Fitting | Aluminum | |||
| Additional Body Notes: | |||||
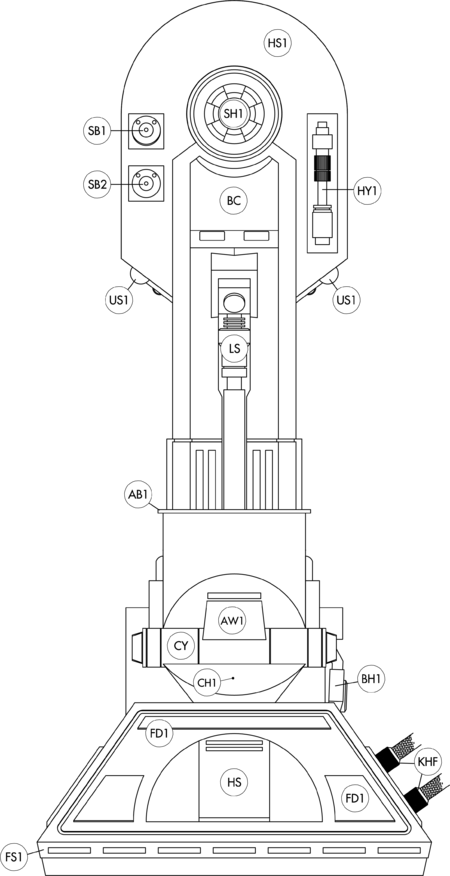
| Legs | |||||

|
Ref# | Name | Color | Notes | Complete |
| AB1 | Ankle Base Plate | Aluminum | |||
| AW1 | Ankle Cylinder Wedge | {{{paccentcolor}}} | |||
| BC | Booster Cover | {{{paccentcolor}}} | |||
| BH1 | Battery Harness | {{{paccentcolor}}} | |||
| CH1 | Cylinder Holder | {{{paccentcolor}}} | |||
| CY | Cylinders | {{{paccentcolor}}} | Refer to AC1 in Center Foot Section Ankle Cylinders have two parts traditionally, the ends are aluminum and the center section is painted. |
||
| FD1 | Foot Details | {{{os1}}} | |||
| FS1 | Foot Strips | {{{os1}}} | |||
| HM1 | Half Moon Details | {{{os1}}} | |||
| HS1 | Shoulder Horseshoe | {{{os1}}} | |||
| HY1 | Shoulder Hydraulics | Aluminum | |||
| KHF | Knurled Hose Fitting | Aluminum | |||
| LS | Leg Strut | Aluminum | |||
| SB1 | Shoulder Button (Upper) | Aluminum | |||
| SB2 | Shoulder Button (Lower) | Aluminum | |||
| SH1 | Shoulder Hub | Aluminum | |||
| US1 | Under Shoulder Details | Aluminum | |||
| Additional Leg Notes: | |||||
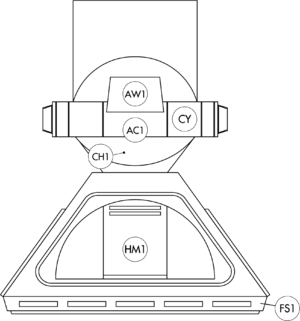
| Center Foot | |||||

|
Ref# | Name | Color | Notes | Complete |
| AW1 | Ankle Cylinder Wedge | {{{paccentcolor}}} | |||
| AC1 | Cylinder (Center Section) | {{{paccentcolor}}} | |||
| CH1 | Cylinder Holder | {{{paccentcolor}}} | |||
| CY | Cylinders (Ends) | Aluminum | |||
| FS1 | Foot Strips | {{{os1}}} | |||
| HM1 | Half Moon Details | {{{os1}}} | |||
| Additional Foot Notes: | |||||
The following three options will populate an entire droid based on the R2D2 panel scheme. Change the color name to appropriate color for the droid.
dbc = Black "Dome Base Color" paccentcolor = Silver " Primary Accent Color" os1 = Black "Outer Skin Color"
The following are individual options where a specific color can override the main accent color.
Each of these parameters can also include a 'note'. To use a note, just add 'note' at the end of the parameter and it will be passed to the page.
DB1 = "Dome Bump 1"
DB2 = "Dome Bump 2"
HP1 = "Holo Projector 1 "
HP2 = "Holo Projector 2 "
HP3 = "Holo Projector 3 "
PP1 = "Pie Panel 1 "
PP2 = "Pie Panel 2 "
PP3 = "Pie Panel 3 "
PP4 = "Pie Panel 4 "
PP5 = "Pie Panel 5 "
PP6 = "Pie Panel 6 "
P1 = "Panel 1"
P2 = "Panel 2"
P3 = "Panel 3"
P4 = "Panel 4"
P5 = "Panel 5"
P6 = "Panel 6"
P7 = "Panel 7"
P8 = "Panel 8"
P9 = "Panel 9"
P10 = "Panel 10"
P11 = "Panel 11"
P12 = "Panel 12"
P13 = "Panel 13"
P14 = "Panel 14"
RE1 = "Radar Eye"
TP1 = "Panel 1"
DR = "Dome Ring"
BP1 = "Body Panel 1"
BP2 = "Body Panel 2"
BP3 = "Body Panel 3"
BP4 = "Body Panel 4"
BP5 = "Body Panel 5"
BP6 = "Body Panel 6"
BP7 = "Body Panel 7"
BP8 = "Body Panel 8"
BP9 = "Body Panel 9"
BP10 = "Body Panel 10"
BP11 = "Body Panel 11"
BP12 = "Body Panel 12"
BP13 = "Body Panel 13"
BP14 = "Body Panel 14"
BP15 = "Body Panel 15"
BP16 = "Body Panel 16"
BP17 = "Body Panel 17"
BP18 = "Body Panel 18"
BP19 = "Body Panel 19"
BP20 = "Body Panel 20"
BP21 = "Body Panel 21"
BP22 = "Body Panel 22"
BP23 = "Body Panel 23"
BP24 = "Body Panel 24"
CVP = "Center Vent Panel"
CR1 = "Coin Return 1 (Front)"
CR2 = "Coin Return 2 (Rear Left)"
CR3 = "Coin Return 3 (Rear Right)"
CV1 = "Center Vent (Upper)"
CV2 = "Center Vent (Lower)"
L2B = "Leg to Body Hub"
OP1 = "Octagon Port 1 (Front)"
OP2 = "Octagon Port 2 (Rear)"
PC1 = "Power Coupler 1 (Front)"
PC2 = "Power Coupler 2 (Rear)"
PV1 = "Pocket Vent (Front)"
PV2 = "Pocket Vent (Rear)"
SV1 = "Side Vent 1"
SV2 = "Side Vent 2"
UA1 = "Utility Arm 1 (Upper)"
UA2 = "Utility Arm 2 (Lower)"
AD1 = "Ankle Details"
BB1 = "Battery Box 1 (Left)"
BB2 = "Battery Box 2 (Right)"
BH1 = "Battery Harness"
AB1 = "Ankle Base Plate"
KHF = "Knurled Hose Fitting"
BODYNOTES = "Additional Body Notes"
AB1 = "Ankle Base Plate"
AW1 = "Ankle Cylinder Wedge"
BC = "Booster Cover"
BH1 = "Battery Harness"
CH1 = "Cylinder Holder"
CY = "Cylinders"
FD1 = "Foot Details
FS1 = "Foot Strips
HM1 = "Half Moon Details"
HS1 = "Shoulder Horseshoe"
HY1 = "Shoulder Hydraulics"
KHF = "Knurled Hose Fitting"
LS = "Leg Strut"
SB1 = "Shoulder Button (Upper)"
SB2 = "Shoulder Button (Lower)"
SH1 = "Shoulder Hub""
US1 = "Under Shoulder Details"
LEGNOTES = "Additional Leg Notes"
AW1 = "Ankle Cylinder Wedge"
AC1 = "Cylinders|Cylinder (Center Section)"
CH1 = "Cylinder Holder"
CY = "Cylinders (Ends)"
FS1 = "Foot Strips"
HM1 = "Half Moon Details"
FOOTNOTES = "Additional Foot Notes"
| The above documentation is transcluded from Template:REQ-R2/doc. (edit | history) Editors can experiment in this template's sandbox (create | mirror) and testcases (create) pages. Please add categories to the /doc subpage. Subpages of this template. |
